Saturday, November 20, 2021

connecting the pipes with the catridges

 before: drilling   ↓cutting the pipes

 ¹ fill the cartridges completely with ink. 
 ─knock carefully on the cartridges, this will force air bubbles under the lids to escape through the holes
 ─if you use empty catriges wait longer until the ink is soaked completely into the sponge    

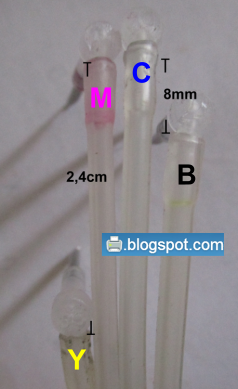
² put the gaskets into the drilled holes. If you used a 4mm drill bit it will be easier   Gimlet = 3,6mm

³ e.g. in a sink or washbowl: fill the ciss with the 4 colors up to ~85%. Keep the needles higher than the ciss, or keep them out of the washbowl

⁴ move the L connectors down  until  ink flows out of all 4 tubes. Then block the pipes with the ink stopper.

⁵ push the L connectors into the  gaskets  -_-   order Y M C B

⁶ tilt the ciss ( both chambers closed with the plugs ) until the smaller air chamber is on top and in a horizental possition

⁷ tilt the ciss back, insert the cartridges into the holders and the pipes into the pipes holder.

whilst printing keep the air chambers open, in the best case via a 1 in 4 venting plug


OPTIONs
─after drilling the holes, try to prepare a way with a 1,5mm screwdriver into the sponge for the needles  , but don't go to deep.

─seal the connection pipes-cartridges  with elastic glue or latex paint
 

 before ⁵ : try to make a "hole" in the sponge for the needle with a ~2mm screwdriver, but don't go to deep.

NOTE: If you don't do it like described, you will get a 1,5mm air layer underneath the cartridge lid. You can try to remove this air via the suction tool, nozzles up.
It could be, that you can't remove the air completely via the suction tool.

IMG: the 3,6mm cyan hole sealed after 1,5y with ~5 layers water based acryl heating color


cl511 this image shows too the 0,5mm venting hole, covered before with the catridge label.  I removed a lot of plastic from this lid.

Thursday, November 18, 2021

cutted pipes

Black ─8mm
Yellow ─2,4cm


the venting screw in a drilled 4mm hole worked only for a short time  (underneath the screw: rubber ○)

if you get air bubbles in a tube:
•drill a 3 mm hole into der catridge lid
•press slowly air with a syringe into the venting hole -_- you can lift too the ciss a little up
•when the drilled hole is filled with ink, block the pipes with the ink stopper
•insert the conic plug into the hole
•secure the plug with glue or elastic latex paint

Wednesday, February 3, 2021

Thursday, January 7, 2021

cartridges

 you can exchange the canon cl/pg51x cartridges without electricity faster by pushing back the white locking mechanism

image by @SeX 

Wednesday, October 21, 2020

ciss

 important: buy a ciss system with needles in the elbows. The needles will prevent air bubles in the tubes. Cheapest price  ebay ~8$ .  


included cartridge clips -_- other names:  suction tool
•~5cm hight   → hp301  with thin wood from e.g. wooden salad boxes you can use the clip too for canon catridges.
a seldom included item is a plastic canon adapter

•~2cm hight,  testet with canon  PG/CL51x + 540/541catridges  → 11m.de/canonclip

Drilling the color catridge
remove the label
close the magenta top airhole with (super)glue
drill the magenta hole @ the connection from the 5th to the  6th  furrow (counted from top -_- left side)

use the included drill tool to remove plastic for the head from the magenta elbow.

you will find different  videos @ youtube

image by

Sunday, April 26, 2020

drainage

i use the waste ink in markers or in spray bootles.
You can connect too the silicone tube comming from the purge unit with a seperated part from the ciss tubes.
Outer diameter ciss tubes = inner diameter silicone tube

The plastic part is fastened with wood screws in the rear cover.

deep cleaning c+b =~ 0,3ml


Thursday, May 25, 2000

venting

 you can use too the  ink stopper to block the 4 venting pipes